Daisy Chain Quilt
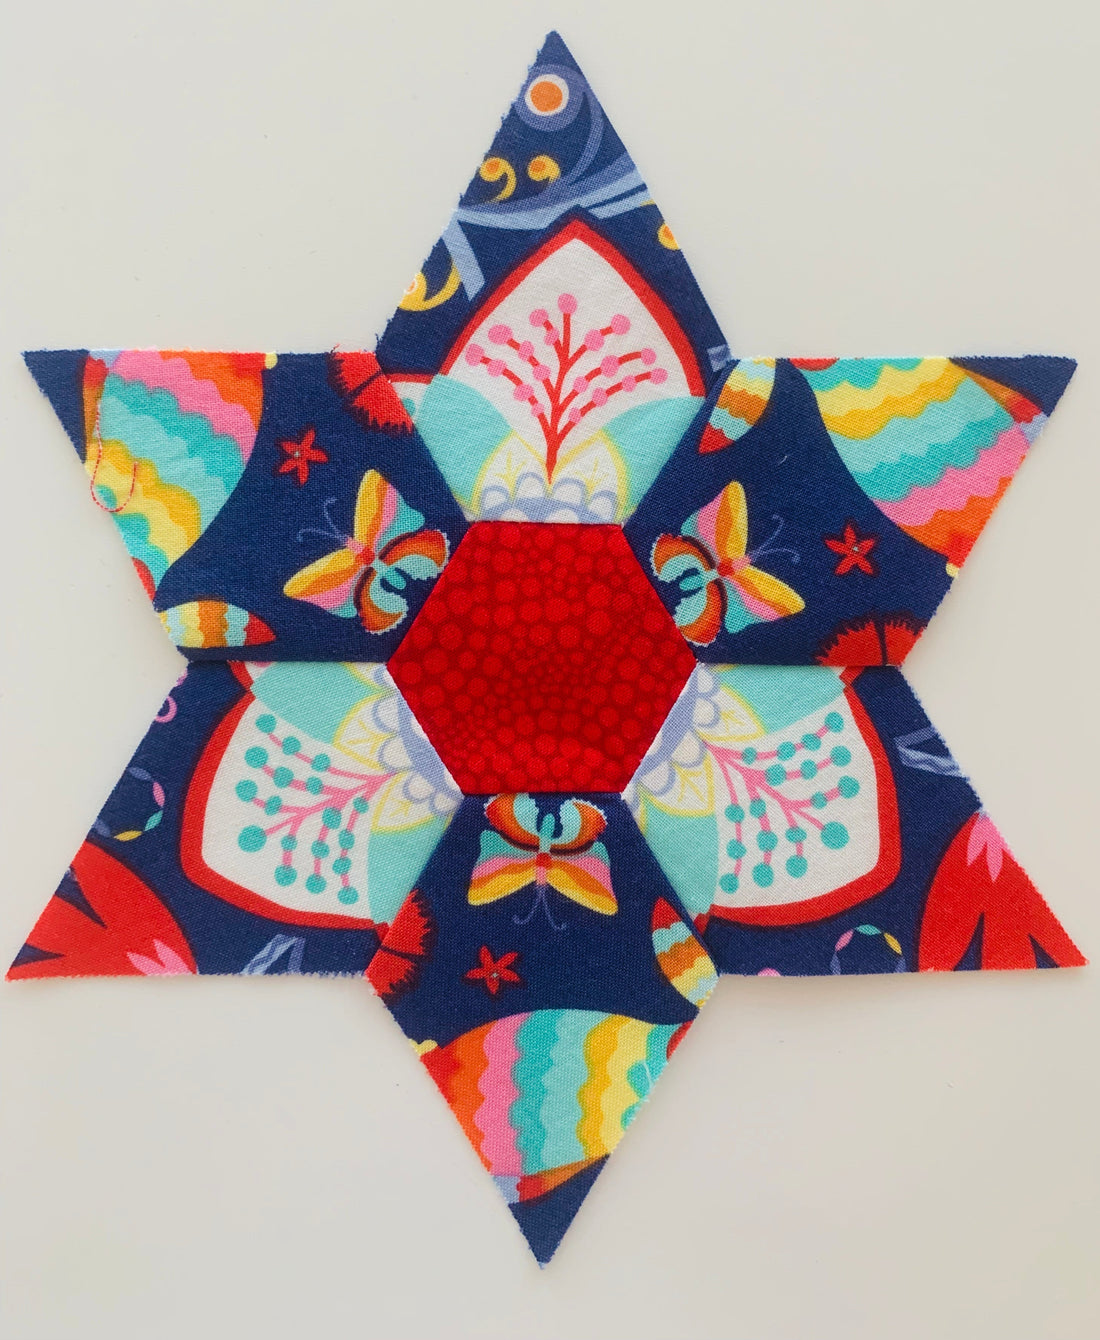
Let's look at the make up of the Daisy Chain Quilt.

1" Hexagons are in the center, surrounded by 1" Jewels, creating the daisy.

These are the self stick templates used to straight stitch by hand or machine.

Straight stitching by hand.
Stitch Jewels to all (6) sides of the Hexagon.
Stitch along side, not through the template from corner to corner, tacking at the beginning and end. Do not stitch into the 1/4" seam allowance.

Jewels have been stitched to all (6) sides of the center Hexagon.
Center a Jewel template and stitch both short sides of the Jewel.
Move the Jewel template to every other Jewel. If you move the template to the Jewel next door, you have already stitched one side of that Jewel previously. Moving the template to every other Jewel, enables you to stitch two sides, moving the template 3 times vs 6.
Tiny time saving tips add up when you multiply the number of times you are going to repeat this step.

Hexagon on top, jewels arranged in the order they will be stitched, makes for meditative stitching. Love the Moda Tin for a travel container.
Most of the daisies in this quilt were hand pieced from scraps. Make combinations while at home, place in a travel container, for an on-the-go project.

The tin holds the daisy combinations, English Paper Piecing Made Modern | Self Stick Templates, a neutral thread (bobbins are tiny vs a spool), needle, a Thimble Pad, sometimes a tiny pair of scissors and a piece of fabric to keep the pins in one place. The pins hold the daisy combinations together. It is not necessary to pin the sections you are stitching, unless you want too.
It is a good idea to carry some kind of bag to place your completed daisies in. They don't fold back up into the tin very well. It could simply be a quart Zip Lock bag.
Some people can not, or do not like, hand stitching.
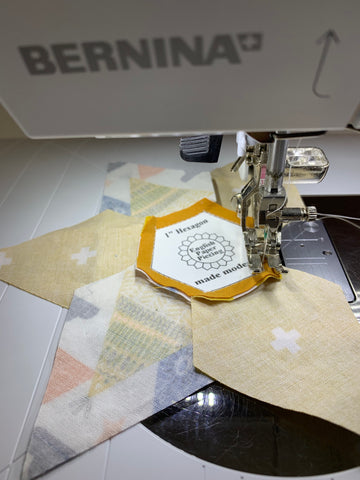
You can stitch the daisies by machine.
Whether you are stitching by hand or machine there is no basting/gluing, whip-stitching or removing papers.
Use the templates, and an Add A Quarter Ruler (it creates the 1/4" seam allowance) and a rotary cutter, to cut out the shapes. Then reuse the templates to straight stitch shapes together. This method is more than a time saver, it is a game changer.
Stitch Jewels to all (6) sides of the Hexagon. Stitch along side, not through the template from corner to corner, tacking at the beginning and end.
Do not stitch into the 1/4" seam allowance. Same as hand stitching, only by machine.
Once Jewels are stitched to all 6 sides of the center Hexagon, remove the Hexagon template.
The Hexagon template can be use multiple times, so set it aside.
Tip: it likes to stick to some form of fabric vs a hard surface. They are pretty durable but if they have only been use a couple of times they may not let go of a hard surface.

(Move the template from the shape you are working on to the next shape you are going to work on.) The templates do not stay in your project, unlike traditional paper. Bonus: Nothing to pull out later.

The daisies are connected with 2" Diamonds.
Please note: You do not want to stitch the diamonds on daisies, until you are ready to assemble the quilt. If the daisies have diamonds on all sides, you will have a beautiful hexagon block, not a daisy chain.

See how they fit together. One side of the chain fits into next row.
When assembling, it is easier to add a set of 3 daisies at a time vs a whole chain. Stitching the daisies together requires is a lot of flipping back and forth. Three at a time is more manageable.

This is an extra design wall (portable). I am using a quilt rack and the material I referenced in a previous Bog Post. I arranged the daisies, trying to spread the color. I was not loving the arrangement. This picture actually looks pretty good but in reality, I was seeing clumps of color.

So I got the idea of arranging diagonal lines of color. I place contrasting colors in diagonal lines. Example: Orange, blue, purple, yellow, dark. That made me happy, so that is what I decided to go with. (The science of decision making, Happy)
I pinned each daisy to the design wall because if the sweeper gets anywhere close to the design wall they all flutter down. Yes, that did happen

Since the daisies were pinned I was able to take it off the quilt rack, fold it up and travel with it to the lake house.
It is hard to see but the first 4 rows at the top are all piece together. Progress anywhere is a win.

The 2" Diamonds are this polka dot fabric, lets cut lots of diamonds at once.
Fold the fabric width wise (selvage to selvage) the bottom edge you are looking at is the folded edge.
Cutting strips is an efficient method to cut multiple diamonds. The width of the 2" diamond is 1-3/4" plus a 1/4" on each side for the seam allowances = 2-1/4" strips.

Tip: To avoid doing the math, place the self-stick template (this applies to whatever shape you are using) on the fabric and trim the fabric shape out with Add A Quarter ruler. Leave the template on the shape you just cut. It will be your guide.
Then measure that cut fabric shape to determine the width to cut strips.

Carefully stack 4 cut strips.
Place the fabric shape with the template, you cut as your guide, on the stack of strips making sure all edges line up. Having already cut the guide eliminates trying to line the template up in the center of the strip.
Use the Add A Quarter Ruler, it butts up to the edge of the template and trim out the shape.
Notice: You only need to make 2 cuts, bottom and top. After the first cut you will only need to make 1 cut.
You will get 7 diamond cuts per strip. You have stacked the strips 4 high which means 8 diamonds per cut x 7 = 56 diamonds. Pretty productive.
Tip: Stacking the diamonds wrong side up enables you to pick up and sew.

These templates make fuzzy cutting very easy. Place the template on the motif, trim with the Add A Quarter Ruler.
Find that same motif, line up the previous fabric shape with the template still on, use the Add A Quarter ruler and trim out another shape. That simple.
I hope you have enjoyed seeing how the Daisy Chain is assembled.
Please feel free to share this information on social media sites you frequent. I appreciate you sharing. Comments and feedback are also appreciated, lets me know you are out there.
Visit my YouTube channel for more tips and tutorials.
Thank you,
Becky